Release 8.1.5
A67766-01
Library |
Product |
Contents |
Index |
| Oracle Advanced Security Administrator's Guide Release 8.1.5 A67766-01 |
|
This chapter contains information on how to configure Oracle for use with Kerberos authentication and to configure Kerberos to authenticate Oracle users.
This chapter covers the following topics:
You enable Kerberos authentication by performing the following tasks, each of which is fully described in the next few pages.
Perform the following tasks in the order listed.
Step 2: Configure a service principal for an Oracle server
Step 3: Extract a service table from Kerberos
Step 4: Install an Oracle server and an Oracle client
Step 6: Configure Net8 and Oracle
Step 7: Configure Kerberos authentication
Step 8: Create a Kerberos user
Step 9: Create an externally-authenticated Oracle user
Do this on the machine that will act as the authentication server
|
More Information:
For information on how to install Kerberos on your machine, see "Related Publications" in the Preface of this guide. |
For the Oracle Server to be able to validate the identity of clients that authenticate themselves using Kerberos, you must first create a service principal for Oracle.
The name of the principal should have the following format:
kservice/kinstance@REALM
|
Note: The utility names in this section are actual programs that you run. However, the Kerberos user name "krbuser" and realm "SOMECO.COM" are examples only: the actual names may vary among systems. |
For example, if kservice is oracle, and the fully-qualified name of the machine on which Oracle is running is dbserver.someco.com, and if the realm is SOMECO.COM, the principal name would be:
oracle/dbserver.someco.com@SOMECO.COM
It is a common convention to use the DNS domain name as the name of the realm.
To create the service principal, run kdb5_edit. The following example is UNIX specific.
# cd /krb5/admin
# ./kdb5_edit
To add a principal called oracle/dbserver.someco.com@SOMECO.COM to the list of server principals known by Kerberos, type the following:
kdb5_edit:ark oracle/dbserver.someco.com@SOMECO.COM
You now need to extract the service table from Kerberos and copy it to the Oracle server/Kerberos client machine.
For example, to extract a service table for dbserver.someco.com, do the following:
kdb5_edit:  xst dbserver.someco.com oracle
'oracle/dbserver.someco.com@SOMECO.COM' added to keytab
'WRFILE:dbserver.someco.com-new-srvtab'
kdb5_edit:  exit
oklist -k -t dbserver.someco.com-new-srvtab
After the service table has been extracted, verify that the new entries are in the table in addition to the old ones. If they are not, or you need to add more, use kdb5_edit to append the additional entries.
If you do not enter a realm (for example, SOMECO.COM) when using xst, it uses the realm of the current host and displays it in the command output, as shown above.
If the Kerberos service table is on the same machine as the Kerberos client, you can simply move it. If the service table is on a different machine from the Kerberos client, you must transfer the file with a program like binary FTP. The following example is UNIX specific.
# mv dbserver.someco.com-new-srvtab /etc/v5srvtab
The default name of the service file is /etc/v5srvtab. If a different name is used, then that name should be substituted for the default name.
Verify that the owner of the Oracle Server executable can read the service table (in the above example, /etc/v5srvtab). To do that, set the file owner to the Oracle user or make the file readable by the group to which Oracle belongs.
Do this on the Oracle server and Oracle client machines.
Do this on the Oracle server and client.
|
More Information:
See your operating system-specific documentation. See also the Net8 Administrator's Guide. |
You must set certain parameters in the Oracle server and client sqlnet.ora files. The next few pages explain how to do the following tasks.
Unless otherwise indicated, you can configure Kerberos authentication either by using the Net8 Assistant, or by modifying the sqlnet.ora file with any text editor.
This graphical interface tool makes it easy to set parameters in the sqlnet.ora file and other Oracle8i configuration files.
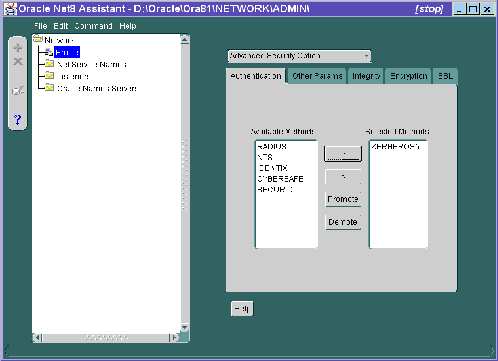
In the Net8 Assistant's left pane, click the Profile folder. Then go to the drop down list box at the top of the right pane, and select Advanced Security Option. The tabbed pages for the Oracle Advanced Security option appear.
Go to the menu bar and click File > Save Network Configuration.
Do this by setting the SQLNET.AUTHENTICATION_SERVICES parameter.

| Use the Net8 Assistant... | ...or modify SQLNET.ORA |
|---|---|
|
Refer to Figure 5-1.
|
SQLNET.AUTHENTICATION_SERVICES=(KERBEROS5) |
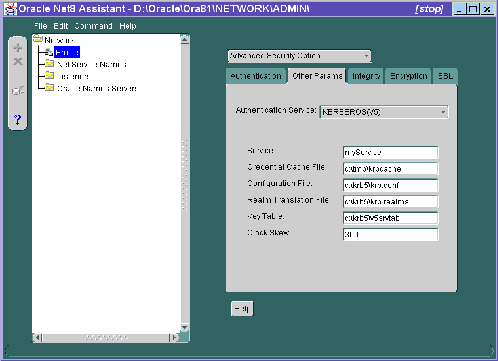
Do this by setting the SQLNET.AUTHENTICATION_KERBEROS5_SERVICE parameter. You may also set various optional parameters described in this section.

| Use the Net8 Assistant... | ...or modify SQLNET.ORA |
|---|---|
|
Refer to Figure 5-2.
You may provide values for the following parameters: |
You must set the following parameter: SQLNET.AUTHENTICATION_KERBEROS5_SERVICE=kservice Note: The above parameter specifies the name of the service Oracle will use to obtain a Kerberos service ticket. You must substitute a value for the kservice part of the service name. Note also: The value passed by the parameter SQLNET.AUTHENTICATION_KERBEROS5_SERVICE is case sensitive; it must be lower case. You may set the following parameters, each of which is described in the section "Optional SQLNET.ORA Parameters" |
Use a text editor to add the following parameter to the init.ora file used for the database instance:
REMOTE_OS_AUTHENT=FALSE
Because Kerberos user names can be long and Oracle user names are limited to 30 characters, Oracle Corporation strongly recommends that the following null value be used for the value of OS_AUTHENT_PREFIX:
OS_AUTHENT_PREFIX=""
Setting OS_AUTHENT_PREFIX to a null value overrides the default value of OPS$.
In addition to the above required parameters, you can optionally set the parameters described below on the client or server.
To create Oracle users that Kerberos can authenticate, perform the following steps on the Kerberos authentication server where the administration tools are installed.
It is assumed that the realm already exists.
Run /krb5/admin/kdb5_edit as root to create the new Kerberos user, for example, "krbuser". The following example is UNIX specific.
# ./kdb5_edit
kdb5_edit: ank krbuser
Enter password:  <password not echoed to screen>
Re-enter password for verification:  <password...>
kdb5_edit: quit
Run SQL*Plus on the Oracle server to create the Oracle user that corresponds to the Kerberos user. In the following example, OS_AUTHENT_PREFIX is set to "".
SQL> CONNECT INTERNAL;
SQL> CREATE USER "KRBUSER@SOMECO.COM" IDENTIFIED EXTERNALLY;
SQL> GRANT CREATE SESSION TO "KRBUSER@SOMECO.COM";
Before you can connect to the database, you must ask the Key Distribution Center (KDC) for an initial ticket. You do this by running the following on the client:
okinit (user name)
|
More Information:
For information on using okinit, see "Utilities for the Kerberos Authentication Adapter". |
If, when making a database connection, a reference such as
sqlplus /@oracle
follows a database link, you must use the forwardable flag (-f option). Executing okinit -f enables credentials that can be used across database links. You should be on the Oracle client before running the following commands:
% okinit -f
Password for krbuser@SOMECO.COM:<password not echoed to screen>
The following three utilities are shipped with the Oracle Kerberos authentication adapter. You should be on the Oracle client before running these commands.
| Command | Description |
|---|---|
|
okinit |
Gets an initial ticket |
|
oklist |
Displays a list of currently-owned tickets |
|
okdstry |
Removes all tickets from the credentials cache |
These utilities are intended for customers who are running an Oracle client with an Oracle Kerberos authentication adapter installed.
okinit obtains and caches Kerberos tickets. okinit is typically used to obtain your ticket-granting ticket, using a password entered by the user to decrypt the credential from the key distribution center (KDC). The ticket-granting ticket is then stored in the user's credential cache. The following options are available with okinit.
Users can run oklist to display the list of tickets they hold. The show flag option (-f) displays additional information.
% oklist -f
27-Jul-1995 21:57:51   28-Jul-1995 05:58:14
krbtgt/SOMECO.COM@SOMECO.COM
Flags: FI
Use okdstry to remove credentials from the credentials cache file.
$ okdstry -f
You can now connect to an Oracle Server without using a user name or password. Enter a command like the following:
$ sqlplus /@net_service_name
where net_service_name is a Net8 service name. For example:
$ sqlplus /@oracle_dbname
|
More Information:
For information on external authentication, see Chapter 1, "Introduction to Oracle Advanced Security" and Oracle8i Distributed Database Systems. |
This section lists some common configuration problems and explains how to resolve them.